Week 1: Programming player controls with inputs and outputs
In week 1 students will make their first level, add a player character to their game, and program it to move around inside their level.
Week 1 programming concepts:
- Inputs
- Outputs
- Event-driven programming
- Sequencing
- Iteration (loops)
1: Setting up your game
- You’ll be creating a new game
- You’ll be getting a pack from the marketplace
- Placing an object in the level to become the player object
- Moving and deleting objects
- Creating tilemap layers
- Get the tracer map in joes pack
- Using minimap and using pan tool
- Draw tiles into a tilemap
- Erasing tiles
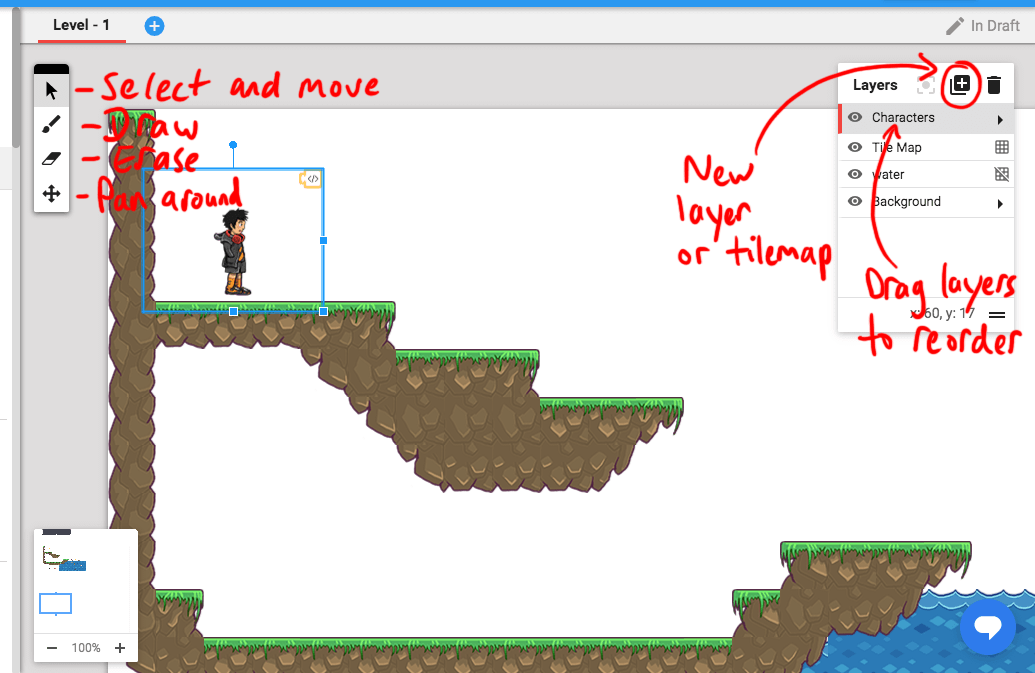
- Test game
- Save game
- In the next step we’ll program a player character to move
To help get you started we’ve created some game art for you to use. We’ve included ‘Nga Tākaro’ in the Gamefroot marketplace.
Are you ready? Let’s start by creating a platform for your game characters to move around on. Watch this video and follow along.
2: Coding a playable character
- Adding script to player
- “When backspace/delete pressed” from events
- Change backspace to right arrow
- Set “velocity x 0” from physics
- Change 0 to 200
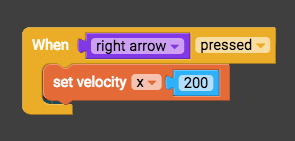
- Press play
- Save script name
- Preview game and press right arrow to test
- Close game to return to script
- In the next step we’ll get the rest of the arrow keys working
In a video game, the player controls the playable character directly.
In this step you will program the player controls in your game. Watch this video to see how to add and write a script to the player object that make it move on key press.
3: Coding a playable character continued
- (if you’ve closed the script you can edit it by right-clicking and edit script)
- Duplicate “When right arrow pressed” block
- Change to when left arrow pressed
- Explain negative x is to the left
- Change velocity 200 to -200
- Duplicate again
- Change to up arrow
- Change velocity x to y
- Explain negative y is up
- Change to -500
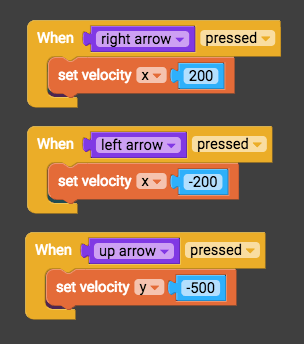
- Play the game to see it moving
- In the next step we’ll add gravity in
So far your character can only move to the right. You’ll fix that by adding more code to the player character. Watch the video below to learn how to add more directions with the up and left arrows.
4: Adding Gravity
- Gravity should start working as soon as the level starts, so grab “When the level starts” from events
- “Set gravity x 0” from physics
- Change 0 to 800
- By default objects won’t react to gravity, so grab “Set reacts to gravity true” from physics

- Play game
- In the next step we’ll stop the player from continuing to move when we release the arrow keys
Video game physics are there to mimic things in real life like motion and gravity, and to make your game more fun. In this step we will show you how to include gravity in your game. This will make game objects, like your character, fall back down when they jump.
Watch the video below. Follow along and learn how to add gravity to your game.
5: Detecting when a key is released
- Duplicate when left arrow pressed
- Change pressed to released
- Change velocity to 0
- Duplicate when right arrow pressed, change to released, change velocity to 0

- Play game
- In the next step we’ll make the camera follow us so we can see where the player moves to
You have coded player controls for moving left, right and jump. Now you need to add code to stop the player from moving when they release the key - this is called an event.
Watch the video below, follow along and learn how to code responses to events; in this case when you stop pressing a key.
6: Cameras in platform games
- “Constantly” from events (this is a loop)
- “Center camera on myself” from looks

- Next week we’ll add some deadly obstacles to our game.
In video games the playable character dictates where the screen should be the focus. In a platform game the camera should closely follow the player.
Watch the video below to make the game’s camera follow the player.
7: Running animation
- "Play animation name" from Animation
- Drag animation block into key-press blocks
- Replace "name" with "run" in animation block
- Duplicate "play animation run" blocks and place duplicates in key-release blocks
- Change duplicates from "run" to "idle"
Animation brings static objects to life. The player character should look like they are running while they move around.
Watch the video below to trigger the player's running animation.