Week 8: Multiple lives and respawning
Step 1: Player lives Part 1
Most games give the player multiple attempts to try to beat a level, usually by displaying health or lives. In this example we'll give the player 4 hearts that they can see, and each heart gives them an extra life. That way when they die they don't have to restart the whole game.
The master heart
To display hearts in game, we need to place a heart that we can reuse. Let's put it in a layer for interface which will be above everything else.
- Make a new layer named "Interface", drag this layer above everything else
- Place heart in the new layer
- Add script to heart
- When created, add tag heart on myself, set physics enabled false
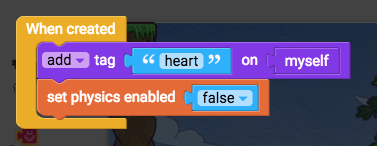
Then this heart can then be cloned by the player so we can display the correct amount.
Cloning new hearts
The player will keep track of how many lives it has, and how many hearts it needs to display.
- Edit the player script
- Add a new variable for keeping track of lives when the level starts, then run a function to create 3 more hearts, and put them in a list so we can manipulate them as a group
- Inside "When the level starts" add these blocks:
- Set number lives to 4 (variables)
- To do something (functions)
- Name this new function "set up hearts"
- Run this function just after setting lives to 4
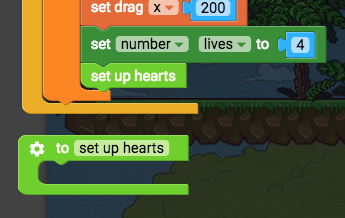
Set up hearts function will create 3 more hearts so we have 4 in total. To create a clone of an object that already exists, use the "create new instance" block, and to target a class of objects with a tag, use "class of myself" combined with "first instance by tag"
- Create new instance of class class (Draw)
- Remove "class class"
- Class of myself (sensing)
- Remove "myself"
- First instance by tag (sensing)
- Make the tag "heart"

Step 2: Player lives Part 2
We can do this 3 times by using the repeat block
- Repeat 10 times (control flow)
- Change 10 to 3

Then we will add all of these hearts to a list, so that we can move them around as a group. This list will be a property variable.
- Set true/false i (variables)
- Change it to "list hearts"
- Get all children by tag (sensing)
- Change tag to "heart"

Now we can make them appear on-screen.
Step 3: Player lives Part 3
Constantly positioning the hearts on-screen
Our 4 hearts are now in a list. Let's make a function to position them all on-screen, and run this function constantly.
- To do something (functions)
- Name this function "position hearts"
- For each item i in list (control flow)

This "for" command is a loop, and it loops through each item in a list, performing a set of actions once for each item in that list. In our case, we want this "for" loop to find the first heart in the list, position it on the camera, and then go and find the next heart in the list, position it a little bit further across, then find the heart after that and position it even further across... etc. We need to give the "for" loop a list to loop through.
- Connect "list hearts" into the "for each" block

Now we can position each heart in the list. We'll set the position of the hearts to the corner of the camera.
- Set x position of instance i to camera x + 10, set y position of instance i to camera y + 10
- Set x position of myself (transform)
- Delete myself block
- Replace myself block with the item variable "i", make sure it is changed from "true/false i" to "instance i"

- Rename i to heart
_+_(operators)- Camera x (looks)
- 10 (operators)

Step 4: Player lives Part 4
Step 5: Player lives Part 5
All the hearts are being positioned at camera x + 10. Let's make each heart get moved across 40 pixels more than the previous heart.
- Replace "10" with a new variable "number heart x offset"
- Set "heart x offset" to 10 just before the for loop starts
- Set heart x offset to increase by 40 after you've set the y position

Now test it out to see the hearts each position themselves 40 pixels further across than the previous heart.
Step 6: Losing lives and respawning Part 1
Now let's make these hearts do something useful. We'll lose a heart instead of dying, so we'll make the last heart disappear when we lose a life.
- Find the "die" function, rename it to "lose a life"

First we should only lose a life if we are alive, so check if we are alive (don't want to lose lives while we are already dying)
- If do (control flow)
- true/false Alive? (variables) Now we'll make the correct heart go invisible. We can count through our list of hearts until we get to the heart that represents our current life, for example if we have 3 lives and we lose a life we need to make the 3rd heart go invisible.
- Set visibility of myself false (looks)
- In list "list list" get # (operators)
- Remove "list list"
- Replace with "list hearts" (variables)
- Number lives (variables)

Test this out so far to see a heart disappear.
Step 7: Losing lives and respawning Part 2
But we still restart the game anyway, so let's fix that. Once that heart goes invisible, we should update the number of lives variable by subtracting 1 from it. Set number of lives to lives - 1.
- Set number of lives (variables)
- - (operators)
- Number of lives (variables)
- 1 (operators)

Then we'll check if the player has any lives left. If they do, we will make them come back to life by enabling their physics and setting "alive?" back to true. But if they don't, we will restart the game.
- If do (control flow)
- Number of lives (variables)
_>_(operators)- 0 (operators)
- Change to "if else"
- Make a new function named "respawn" (to do something, from Functions)
- Make a new function named "game over" (to do something, from Functions)
- Move "3000 milliseconds, go to first level" into "game over"

- In the respawn function, after 1000 milliseconds, set alive true, set physics enabled true, set visibility true.
- 1000 milliseconds have passed (control flow)
- Set alive true (variables)
- Set physics enabled true (physics)
- Set visibility true (looks)
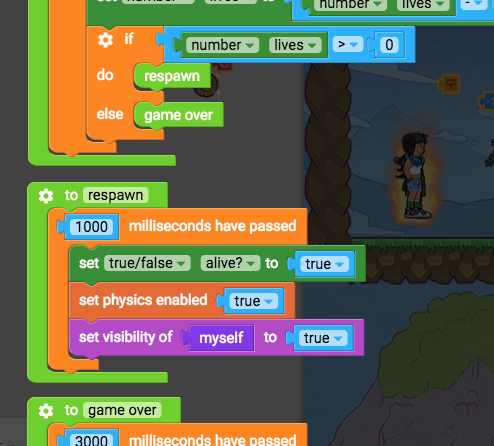
Now test it out to see losing lives, respawning, and losing the game when you run out of lives. One problem: if you land on a deadly obstacle, you will respawn on it and die again. We'll fix that.
Step 8: Losing lives and respawning Part 3
Instead of respawning and being able to die straight away, we'll make the player fade in and out so they look like they have just respawned, and we'll only allow the "lose a life" function to run if the player is fully faded in (checking their alpha).
- In the respawn function, after set visibility true, add:
- Set alpha of myself to 0.4 (looks)
- 200 milliseconds (control flow)
- Set alpha of myself to 0.8 (looks)
- 200 milliseconds (control flow)
- Set alpha of myself to 0.4 (looks)
- 200 milliseconds (control flow)
- Set alpha of myself to 0.8 (looks)
- 200 milliseconds (control flow)
- Set alpha of myself to 0.4 (looks)
- 200 milliseconds (control flow)
- Set alpha of myself to 1 (looks)

- Then in the lose a life function:
- Inside "if alive?", add "if alpha of myself = 1"
- If do (control flow)
- Get alpha of myself (looks)
=(operators)- 1 (operators)

Now test to see that you are unable to die for a short time after you respawn. Nice!
Step 9: Adding lives Part 1
How about a collectable object that gives you another life?
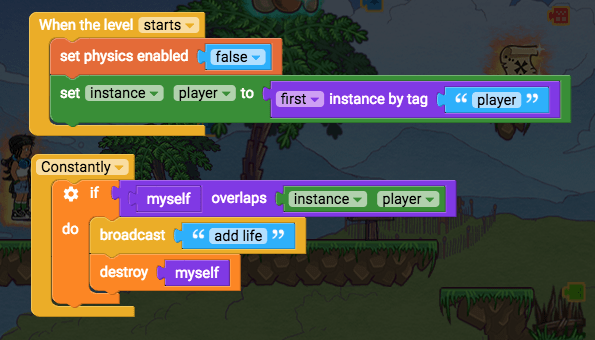
Place a collectable object in your level, and add a new script. It needs to detect when the player overlaps it, so we'll disable its physics, save the player as a variable, and then constantly check if the player is overlapping it. If the player overlapped it, broadcast "add life" then destroy myself.
- When the level starts (events)
- Set physics enabled false (physics)
- New variable: Set instance player (variables)
- First instance by tag player (sensing)
- Constantly (events)
- If do (control flow)
- Myself overlaps instance toucher (sensing)
- Change instance toucher to instance player
- Broadcast message (events)
- Type message "add life"
- Destroy myself (control flow)
Step 10: Adding lives Part 2
Then the player needs to receive that message "add life". When it does, it should run a new function called "add life" which checks if you have less lives than your maximum amount, and if you do, then adds a life back by increasing the lives variable and setting the correct heart back to being visible.
- When I receive "add life" (events)
- To do something (functions)
- Name function "add life"
- "Add life" inside the message receiver
- If do (control flow)
- Number lives (variables)
<(operators)- Length of (operators)
- List hearts (variables)
- Set number lives (variables)
- Number lives (variables)
+(operators)- 1 (operators)
- Set visibility of myself true (looks)
- Remove "myself"
- In list "list list" get # (operators)
- Change "list list" to "list hearts"
- Number lives (variables)

Test this out to see the player gain back a life (if you've already lost a life).
Step 11: Checkpoints Part 1
Many games have checkpoints which save your position in the game, so that when you die you can respawn back on the checkpoint. This allows you to create games with multiple levels that will then send you back to the last level you saved a checkpoint on. This means that you can make your games much more challenging, while also being more forgiving depending on the amount of checkpoints you place.
First you need to place a checkpoint object in you level. This object will constantly detect if the player overlaps it, and then save the player's x position and y position, and save the level that you're on. Add a new script to that object.
- When the level starts, set physics enabled false, set instance player to first instance by tag player
- When the level starts (events)
- New variable: Set instance player (variables)
- First instance by tag player (sensing)

- Constantly (events)
- If do (control flow)
- Myself overlaps instance toucher (sensing)
- Instance player (variables)

Now we'll make a new global variable to save the player's x position. It will be a global variable so that its value will remain accessible across all objects and all levels. If it were a property variable, then other objects would not be able to access it, and it would lose its value when you change the level.
- New global variable: set number player start x position (variables)
- X position of myself (transform)
- Instance player (variables)

- Do the same for the player's y position

We'll also save the current level as a global variable "checkpoint level"
- New global variable: "Set number checkpoint level"
- Go to current level (control flow)
- Put "current level" into "set number checkpoint level"

Step 12: Checkpoints Part 2
Then we'll tell all the other checkpoints to play their "off" animations by broadcasting a message. After that, we'll make this checkpoint play its "on" animation.
- Broadcast "reset checkpoints" (events)
- Play animation "on" (animation)
- When I receive "reset checkpoints" (events)
- Play animation "off" (animation)

Now we need the player to react to these new variables we've set up.
- Edit the player script.
First we'll make the player respawn where the checkpoint was. Find the "respawn" function and add these blocks directly before "alive?" is set to true:
- Set x position of myself to number player start x position
- Set y position of myself to number player start y position
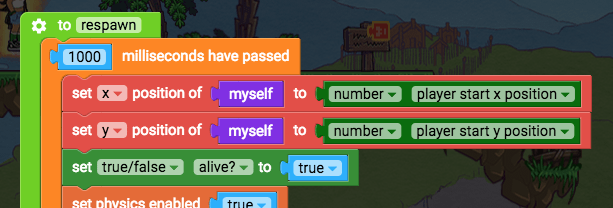
Test this out to see the player respawn on checkpoints when they lose a life
Step 13: Checkpoints Part 3
Uh oh! Something weird happens if you haven't touched a checkpoint and you die. The player is trying to position itself to a position that doesn't have a value. If you haven't touched a checkpoint, the global variables "player start x position" and "player start y position" haven't got values yet, so they aren't a number, not even 0. They are null (no value). When we position an object to null instead of a number, the game engine can't handle it - the computer gets confused. So we need to check if "player start x position" is not null.
- Add "if do" around the set x and set y position blocks inside the "respawn" function. We'll check if number start x position does not = null.
- Number player start x position (variables)
=/=(starts out as = from operators)- Null (operators)

Test it out now to make sure the player respawns on checkpoints when they lose a life Nice.
Step 14: Checkpoints Part 4
Finally we'll get the player to go to the last checkpoint level if they lose all their lives. In the "game over" function, we'll check if checkpoint level is not null, and then go to the checkpoint level. If checkpoint level is null (no value), then that means the player hasn't reached a checkpoint, so they'll have to go back to the first level.
- In the "game over" function, add an "if else" block inside "3000" milliseconds block.
- Number checkpoint level (variables)
=/=(operators)- Null (operators)
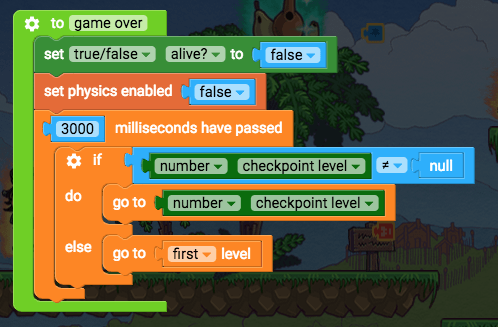
Step 15: Checkpoints Part 5
Then we want the player to spawn in the right location when the player is created in the level. If the player is in the checkpoint level, then set the position of the player to the correct respawn position, otherwise make the current position of the player the new respawn location (that way if the player hasn't triggered any checkpoints, the player will at least respawn at the start of the level).
- In "when created", after adding player tag: if checkpoint level = current level, set position to global vars, else set global vars to my positions

Step 16: Checkpoints Part 6